How to Calibrate about air permeability Tester ?
Air Permeability Tester is suitable for determining the resistance to the passage of air of most textile materials. Then how to calibrate about it?
Calibration Plate
There are built-in A/C values for eight orifice plates. Each orifice plate has a set of A/C value. A/C values in one machine are different from those in another. So you should tell us the serial number of the machine you have now. The serial number is supposed to be 6-digit and sometimes on the calibration plate.

Calibration Plate
For calibration, please use the Φ4.5mm orifice plate;
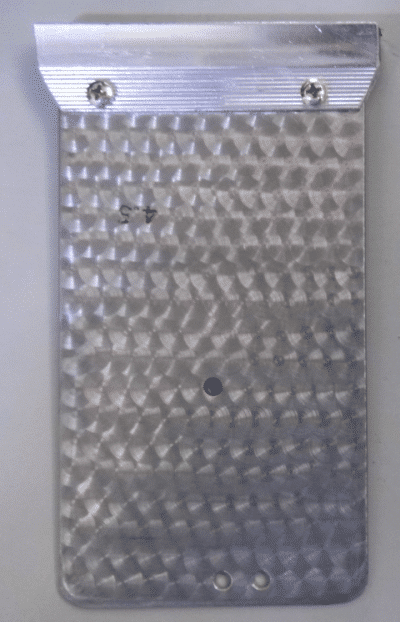
Φ4.5 Orifice Plate
How to carry out calibration:
- Insert the Φ5mm orifice plate into the lower air duct of air permeability Tester;

NOTE: When insert the Φ4.5mm orifice plate, the surface with the digit of “4.5” must be towards up.
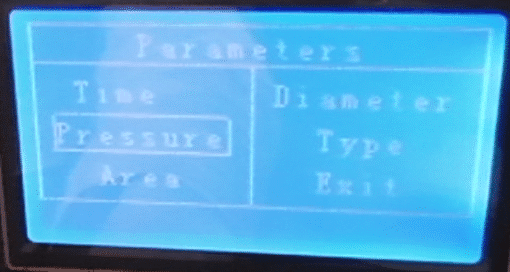
- First to press “SET” button and then press “MOVE” button to select “Pressure”;
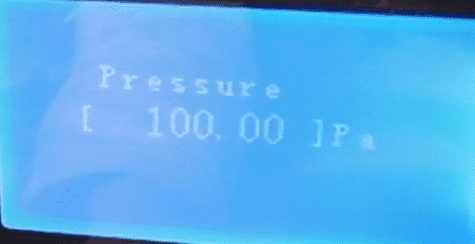
- Press “CONFIRM” button and then press “PRE-N” button to set “pressure” as 100Pa;
- Press “CONFIRM” button to confirm and exit;
- Press “MOVE” button to select “Area”;
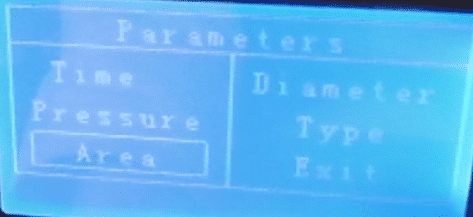
- Press “CONFIRM” button and then press “MOVE” button to select “Area” as 20cm2;

- Press “CONFIRM” button to confirm and exit;
- Press “MOVE” button to select “Exit”, and then press “CONFIRM” button to confirm and exit;
- Place the rubber O-ring on the top of lower clamp, no blocking to aperture on the lower clamp;

- Place the calibration plate on the rubber O-ring and between two clamps;

- Press the lower clamp down to clamp the calibration plate;

- Press “START” button to measure the permeating rate of the calibration plate;
If the difference between the measured result and the permeating rate on the calibration plate is supposed to be within ±2%.
If the difference between the measured result and the permeating rate on the calibration plate is beyond ±2% and there is not place where obvious air leakage occurs, the difference can be corrected by adjusting A/C value of Φ4.5mm orifice plate on the machine.
For example, the permeating rate on the calibration plate is 172, but the measured result is 223.

- Press “RESET” button and long-press the “STOP/DELETE” button; and then A/C value of Φ5mm orifice plate will display on LCD;
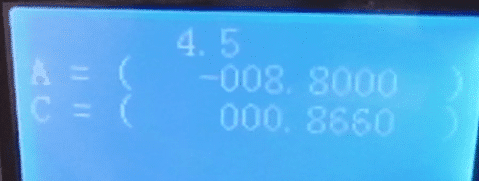
- Press “MOVE” button and “PRE-N” button to change the C value “8660” to be “000.7660”;
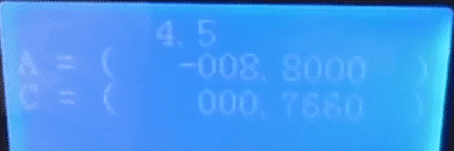
NOTE: If you adjust the C value to be bigger, the measured result of the calibration plate will be bigger; if you adjust the C value to be smaller, the measured result of the calibration plate will be smaller.
- Press “CONFIRM” button to confirm and exit;
- Press “START” button to measure the permeating rate of calibration plate again;

- The measured value is 197, larger than 172 on the calibration plate; Repeat above steps to adjust the C value until the difference between the measured result and 172 on the calibration plate is within ±2%.


Comments are closed.
Great post, you made some really good points, and I agree that this is a really top-notch website.
I’ve been reading your excellent insights for a while, and this article really spoke to me. Thank you so much, and keep motivating people!
Hearty congratulations to the author for creating such a valuable platform that never fails to educate and inspire.
Many readers will find this blog post incredibly informative and thought-provoking.
So much effort and research have clearly gone into crafting this exceptional piece of writing.
Hey, have you read this article? It’s a gem! The author’s writing style is captivating, and the content is both informative and entertaining.